"Photo Editing in Photoshop: A Beginner's Workflow"
Photoshop photo editing for beginners in 9 clear steps. Crop, fix light, correct colour, retouch and export a clean photo with layers you can undo.
Photoshop photo editing works best in a fixed order. Duplicate the photo, crop and straighten, fix exposure with Curves, correct colour, retouch with healing tools, sharpen lightly and export. Do every change on adjustment layers or Smart Objects, so you can undo or change any step later without damaging the original.
Photoshop photo editing is easier when you follow one fixed order: crop, fix light, fix colour, clean up, sharpen and export. Most beginners jump between tools and end up with a photo that looks heavy and over-edited. This guide gives you a simple workflow you can repeat on any photo, from a wedding shot to a product picture for Instagram.
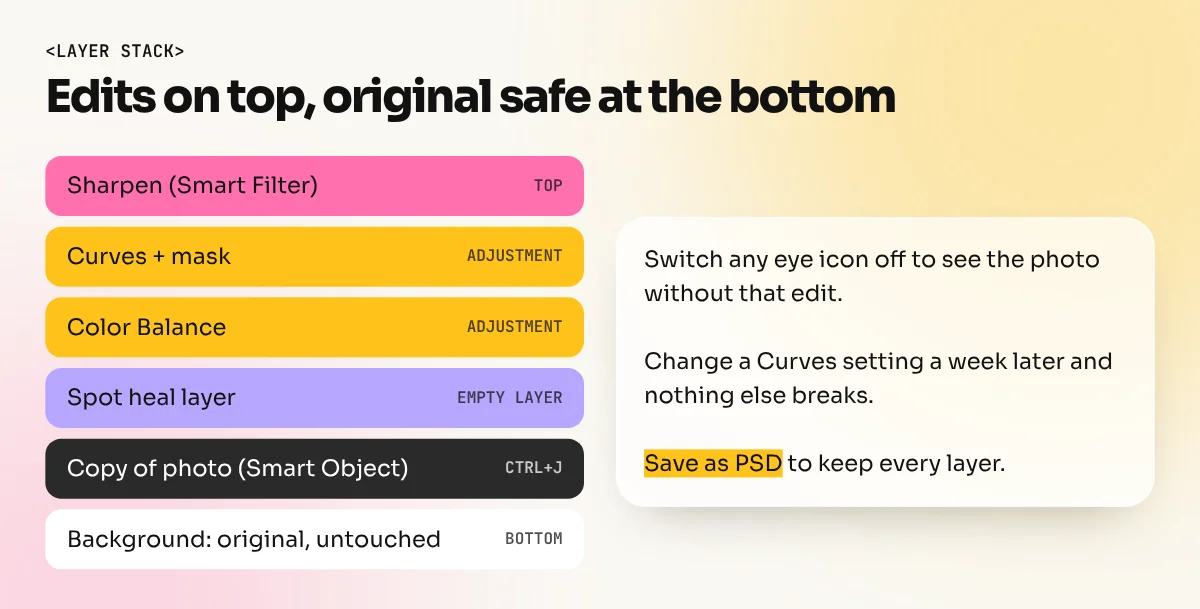
All the steps use non-destructive editing. That means you can always go back and change any step, because nothing is baked into the original pixels. This is the habit that separates a clean professional file from a messy one.
Set up before you edit
Good editing starts with how you open the file.
- Open the photo with File, Open. If it is a camera RAW file, Photoshop opens it in Camera Raw first. Make a basic exposure fix there if you like.
- Check the size. Go to Image, Image Size. A photo for print should be at 300 pixels per inch at the final size. A photo for a screen only needs the pixels you plan to show, such as 1080 pixels wide for an Instagram post.
- Duplicate the layer. Press Ctrl+J (Cmd+J on Mac). Work on the copy and leave the Background layer untouched.
- Save a PSD straight away. Photoshop keeps layers only in the PSD format, so save one before you start.
If you want faster hands, learn the keys in our Photoshop shortcut keys guide.
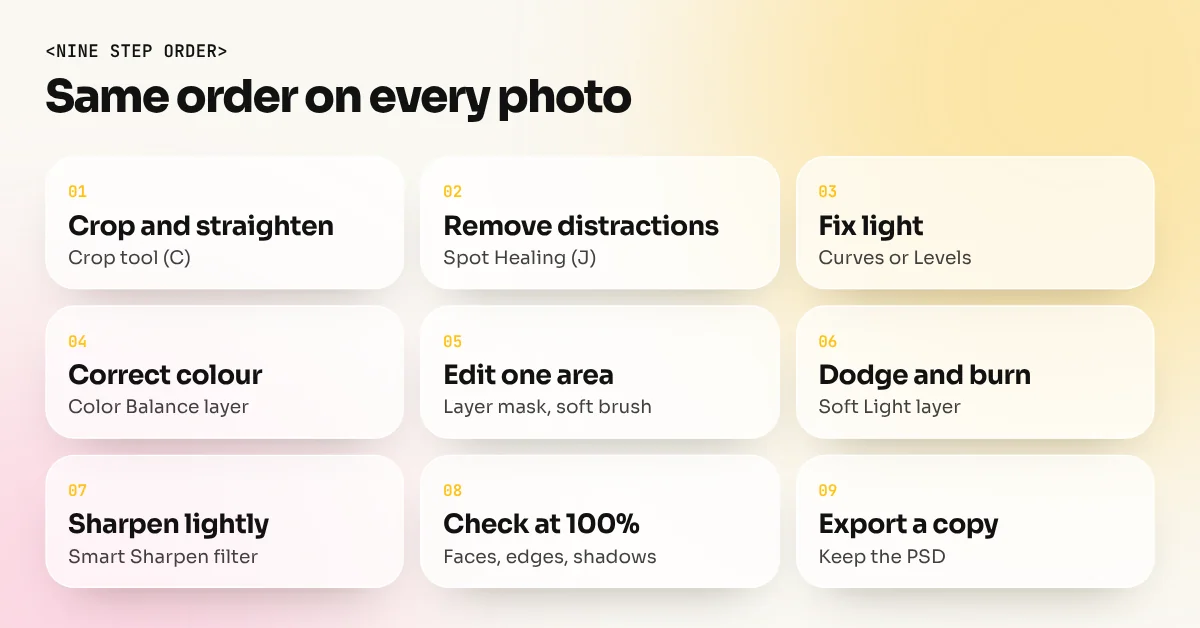
The 9 step workflow
| Step | What you do | Main tool |
|---|---|---|
| 1 | Crop and straighten | Crop tool (C) |
| 2 | Remove distractions | Spot Healing Brush (J), Clone Stamp (S) |
| 3 | Fix brightness and contrast | Curves or Levels adjustment layer |
| 4 | Correct colour cast | Color Balance or Hue/Saturation layer |
| 5 | Edit one area only | Layer mask with a soft brush |
| 6 | Add dodge and burn | A grey or soft-light layer |
| 7 | Sharpen lightly | Smart Sharpen as a Smart Filter |
| 8 | Check at 100% zoom | Zoom tool and hand tool |
| 9 | Export a copy | File, Export, Export As |
Step 1: Crop and straighten first
Select the Crop tool and drag the edges to improve the composition. Keep a tilted horizon straight by using the Straighten option or by rotating outside the box. Keep Delete Cropped Pixels switched off, so the cut-away area stays available if you change your mind. Cropping first means you do not waste time editing parts of the photo that will not appear.
Step 2: Remove distractions
Use the Spot Healing Brush for small marks such as pimples, dust spots and a stray wire. Make a new empty layer first and set the tool to sample all layers. The Clone Stamp copies one area onto another and is better for patterns such as a brick wall. For larger objects like a bin behind a bride, the Remove tool or Generative Fill can help. We cover that in the Photoshop Generative Fill guide.
Step 3: Fix light with Curves or Levels
Add an adjustment layer from the circle icon at the bottom of the Layers panel. Curves is the most powerful tool for light. Click the middle of the line and pull slightly up to brighten or down to darken. Make a gentle S shape to add contrast. Levels is simpler: move the black slider and the white slider in until they touch the start of the histogram. The photo gets proper blacks and whites straight away.
Step 4: Correct colour
If skin looks yellow or the whites look blue, you have a colour cast. Try Color Balance or Photo Filter adjustment layers. Use Hue/Saturation to lift a flat photo a little, but keep saturation moderate. Skin tones go orange very fast. When in doubt, reduce the effect to about half of what looks good, then compare with the original by switching the layer on and off. Our colour theory guide explains how warm and cool colours work together.
Step 5: Edit only one area with a mask
Every adjustment layer comes with a white mask. Paint black on the mask to hide the effect and white to show it. For example, brighten only a face with a Curves layer and a mask painted with a soft black brush on everything else. Masks are the reason Photoshop beats one-click apps. You decide where each edit shows.
Step 6: Dodge and burn
Dodge makes parts lighter and burn makes them darker. Doing it on a separate layer is cleaner than using the tools on the photo. Create a new layer, set the blend mode to Soft Light and paint with a soft white brush at low opacity to lighten an area. Paint with black to darken it. This adds shape to a face or a product without changing colour.
Step 7: Sharpen lightly
Convert the layer to a Smart Object first with right click, Convert to Smart Object. Then go to Filter, Sharpen, Smart Sharpen. Use a small amount. Over-sharpened photos look crunchy and show white edges around objects. Because it is a Smart Filter you can reopen and change it later.
Step 8: Check at 100%
Zoom to 100% and look at the face, the edges and the shadows. Look for halos around cut-outs and for patchy retouching. Then zoom out and view the whole picture, since edits that look fine up close can look heavy from a distance.
Step 9: Export a copy
Save the PSD with all layers. Then go to File, Export, Export As and choose JPG at around 80 to 90 quality for the web. Use PNG if you need a transparent background. For print, send a high-quality JPG or a PDF at full size, as your printer asks.
A before and after example
Think of a photo of a kulhad chai stall taken at dusk in Old Delhi. The raw photo is a little dark, slightly orange and has a bright signboard pulling the eye. A quick edit would be:
- Crop tighter on the glass of chai and the vendor's hands.
- Use Levels to open up the shadows.
- Cool the orange cast a little with Color Balance.
- Paint a mask to bring down the bright signboard.
- Spot heal a few marks on the counter.
- Sharpen lightly and export for Instagram at 1080 pixels.
The whole job takes around 10 minutes once you know the order.
Mistakes beginners make
| Mistake | What happens | Better habit |
|---|---|---|
| Editing the Background layer directly | You cannot undo later | Duplicate it first |
| Using Brightness/Contrast for everything | Highlights burn out | Use Curves or Levels |
| Pushing saturation too high | Skin looks orange and false | Keep it gentle |
| Over-smoothing skin | Faces look like plastic | Keep some natural texture |
| Sharpening before cropping and resizing | Sharpness gets lost or doubled | Sharpen near the end |
| Exporting only a JPG | No way to change later | Keep the PSD |
Another point: be honest with your client about retouching. Natural edits look better and keep the person recognisable.
Where photo editing leads
Photo editing is the base skill for many design jobs: product photography clean-up, wedding albums, social media creatives, posters and e-commerce catalogues. The same tools also make composites and campaign visuals. If you want to learn these tools with live practice on real client images, join our Photoshop course. If you want the full path from basics to a portfolio, see the 6-month graphic design diploma.
This week, take 10 of your own photos and run all of them through the same nine steps. By the fifth photo you will be doing it without looking at the list.
Frequently asked questions
Is Photoshop good for photo editing?
Yes. Photoshop is the standard tool for detailed photo retouching, cut-outs and composites. For quick batch edits of many photos, Lightroom or Camera Raw is faster, but Photoshop gives you the most control on a single image.
Which Photoshop tool should a beginner learn first?
Start with the Crop tool, Curves or Levels, the Spot Healing Brush and layer masks. These four cover most real photo editing jobs. Learn the rest only when a job needs it.
How do I edit a photo without damaging the original?
Duplicate the background layer, use adjustment layers instead of direct adjustments and turn filters into Smart Filters by converting the layer to a Smart Object. Save the file as PSD and keep the original photo untouched.
What size should I export an edited photo?
For Instagram and websites use JPG at the pixel size you need, such as 1080 pixels wide. For print keep the full size at 300 pixels per inch. Always keep a PSD copy for later changes.