How to Design a Brochure in InDesign, Step by Step (Tri-fold and Booklet)
Brochure design step by step in Adobe InDesign: pick the fold, set up panels with bleed, build a grid, write tight copy and export a print-ready PDF.
To design a brochure, first fix the goal, the fold and the size with your printer. In InDesign, make a document with 3 mm bleed and margins, mark the panels with guides, set paragraph styles, then place the cover, the story panels and the contact panel. Run Preflight and export a PDF/X file with crop marks and bleed.
Brochure design is the planning of a folded or stapled printed piece that explains a product, service or place in more detail than a flyer can. To design a brochure well, you decide the goal and the fold first, then build a clean layout in Adobe InDesign and finish with a print-ready PDF. This guide walks through the full process step by step, with panel sizes, a grid, copy tips and the print checks that save money.
A brochure is still one of the most used print jobs in India. Schools give one with every admission form, real estate projects in Noida and Gurugram hand them out at site offices, hospitals keep them at the front desk and every trade fair at Pragati Maidan is full of them. If you can design a good brochure, you will always have work.
Brochure, leaflet or booklet: what are you making?
Clients use these words loosely, so confirm the format before you open any software.
| Format | How it is made | Typical use |
|---|---|---|
| Leaflet or flyer | Single sheet, no fold or one fold | Shop offers, events, coaching batches |
| Bi-fold brochure | One sheet folded in half, 4 panels | Restaurant menus, small company profiles |
| Tri-fold brochure | One sheet folded into 3, 6 panels | Clinics, schools, services, travel |
| Gate-fold brochure | Two side panels fold in to meet in the middle | Product launches, premium property |
| Booklet | Several sheets stapled or bound | Company profiles, catalogues, prospectus |
If the job is a single sheet with one offer, our guide to leaflet design is a better fit. This post is about brochures that fold or bind, where the order of panels and pages really matters.
Step 1: Fix the goal, the reader and the content
Before layout, write three lines on a piece of paper:
- Goal. What should the reader do after reading? Call, visit, book a site visit, fill a form.
- Reader. Who picks it up? A parent at a school counter reads differently from a buyer at a trade fair.
- Content list. Every heading, photo, logo, map and contact detail the client wants.
Ask the client for the final text before you design. Designing with dummy text and then fitting real text later is the most common reason brochures go through ten rounds of changes. If the client has no copy, offer a simple structure: cover message, problem, solution, proof, offer, contact.
Step 2: Choose the fold and size with your printer
Talk to the printer on day one. They will tell you the sheet sizes their machine and folding unit handle and the paper they stock. Common choices:
| Brochure | Flat size | Folded size | Panels |
|---|---|---|---|
| A4 tri-fold | 297 x 210 mm | about 99 x 210 mm | 6 |
| A4 bi-fold | 297 x 210 mm | 148.5 x 210 mm | 4 |
| A3 bi-fold | 420 x 297 mm | 210 x 297 mm (A4) | 4 |
| A4 booklet | A3 sheets folded | 210 x 297 mm | 8, 12, 16 pages |
| A5 booklet | A4 sheets folded | 148 x 210 mm | 8, 12, 16 pages |
For a tri-fold, the panel that tucks inside must be a little narrower, usually 2 to 3 mm, or the paper bulges when folded. A common split for an A4 sheet is 100 mm, 100 mm and 97 mm, but the printer's folding machine decides the final numbers.
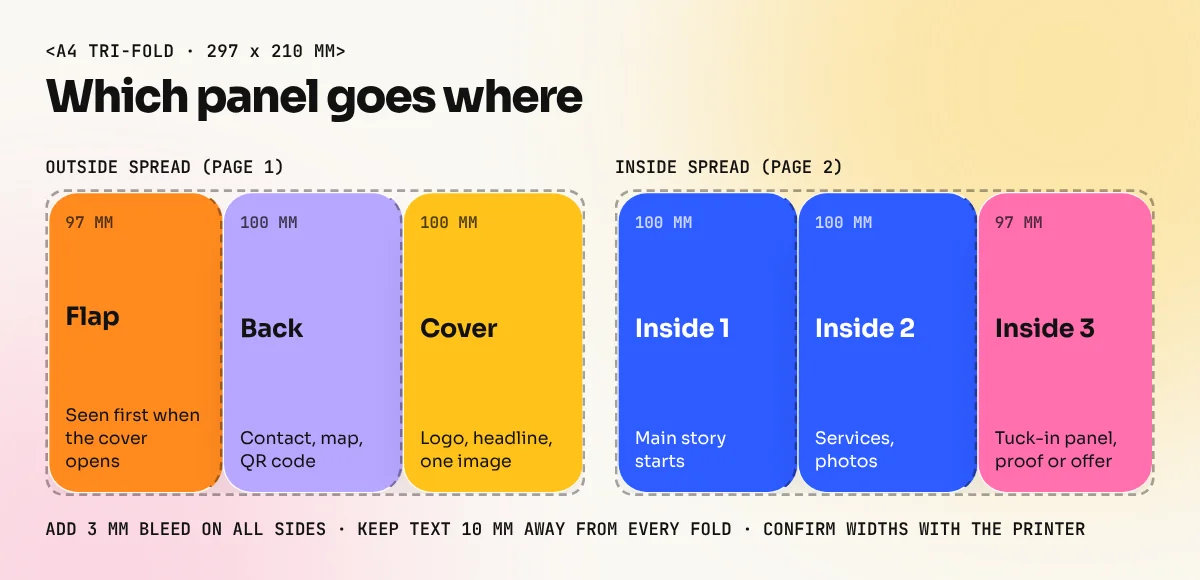
Make a paper dummy. Fold an A4 sheet into three, write "cover", "back", "flap" and "inside 1, 2, 3" on the panels and unfold it. You will see that the cover is on the far right of the outside spread, the back panel sits in the middle and the flap is on the left. Many beginners put the cover on the left and print 500 wrong copies.
Step 3: Set up the document in InDesign
For an A4 tri-fold:
- Go to File > New > Document. Choose the Print intent.
- Set width 297 mm, height 210 mm, the wide (horizontal) orientation, 2 pages (outside and inside) and switch Facing Pages off.
- Set Margins to 10 mm on all sides. This is your safe area for text.
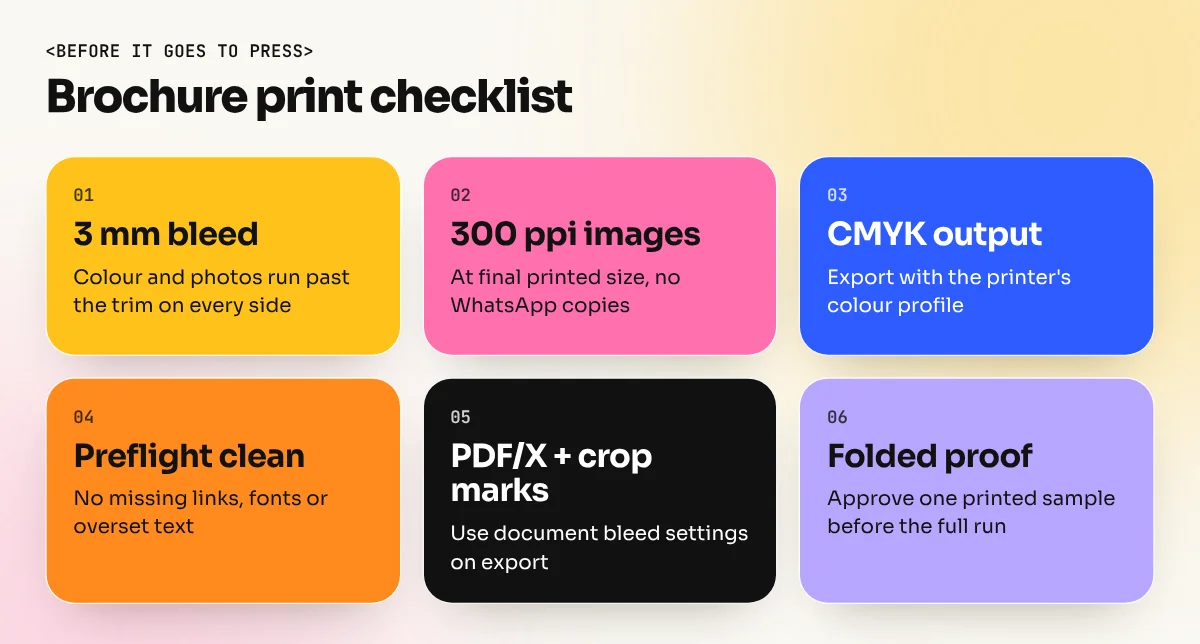
- Set Bleed to 3 mm on all sides. Colour and photos that touch the edge must run into the bleed.
- Click Create, then drag vertical guides from the ruler to mark the panel folds (for a 100, 100, 97 split, at 97 mm and 197 mm on the outside spread and at 100 mm and 200 mm on the inside spread, since the flap flips side).
- Add a gutter of about 10 mm on either side of each fold so text never sits on the crease.
For a booklet, keep Facing Pages on, enter the page count (a multiple of 4) and use the Pages panel. Put repeating items such as page numbers, the logo and a footer line on a parent page. Newer versions of InDesign call these parent pages; older ones say master pages. Change one and every page that uses it updates.
Step 4: Build a grid and set your type styles
A grid keeps six panels or sixteen pages looking like one family. Inside each panel, use one or two columns and a baseline grid so text lines up across panels. A simple rule: every text box starts on a column edge and every heading sits the same distance from the top of its panel.
Then set up styles before you type a word:
| Style | Example setting | Used for |
|---|---|---|
| H1 | Bold sans, 28 to 36 pt | Cover headline |
| H2 | Bold sans, 16 to 20 pt | Panel headings |
| Body | Serif or sans, 9 to 10.5 pt, leading 13 to 14 pt | Main text |
| Caption | 7.5 to 8 pt, lighter weight | Photo captions, small notes |
| Contact | Bold 10 to 11 pt | Phone, WhatsApp, address |
Use Paragraph Styles and Character Styles for all of these. When the client says "make all headings blue", you change one style instead of fifty text boxes. Stick to two type families at most. Body text below 9 pt is hard for older readers, so test a printout at real size.
Step 5: Lay out the panels in reading order
A tri-fold is read in a fixed order. Design for that order, not for the flat sheet.
- Cover (front panel). Logo, one strong headline and one image. No paragraph text. It must work from two metres away on a counter.
- Flap panel (seen first when the cover opens). A short hook: the problem you solve, the main promise or an offer.
- Inside spread (three panels). The main story: services, features, photos, a short proof such as years in business or a testimonial the client has approved.
- Back panel (middle of the outside spread). Contact details, map or QR code to the website or WhatsApp, social handles. People turn the brochure over to find these, so keep them big and clear.
Give each panel one job and one heading. Use photos at 300 ppi at final size and convert them to the printer's CMYK profile when you export (screen colours often look duller on paper, so check a printed proof). Keep the logo, important text and the QR code at least 5 mm away from folds and trim lines.
Step 6: Check, package and export a print-ready PDF
This step separates a student file from a professional one.
- Preflight. Open Window > Output > Preflight. Fix every red error: missing links, missing fonts, overset text (text hidden because the box is too small).
- Proofread on paper. Print the brochure at 100 per cent on your office printer, fold it and read every word. Check phone numbers twice.
- Package. Use File > Package to collect the InDesign file, all linked images and fonts into one folder for the printer or for your archive.
- Export. Use File > Export > Adobe PDF (Print). Pick the PDF/X preset your printer asks for (often PDF/X-1a or PDF/X-4). In Marks and Bleeds, tick Crop Marks and Use Document Bleed Settings.
- Approve a hard proof. Ask the printer for one printed and folded proof before the full run. It costs a little and saves a lot.
Common brochure design mistakes
| Mistake | What happens | Fix |
|---|---|---|
| Cover on the wrong panel | Brochure opens backwards | Make a folded paper dummy first |
| Text across a fold | Words disappear into the crease | Keep a 10 mm gutter at every fold |
| No bleed | Thin white edges after trimming | 3 mm bleed on all sides |
| Too much text | Nobody reads it | One idea per panel, short points |
| RGB photos from WhatsApp | Dull, blurry print | Ask for originals, 300 ppi, CMYK export |
| Every panel a different style | Looks cheap | One grid, two fonts, set styles |
The best way to avoid these mistakes is practice. Pick a real local business near you, a dental clinic, a chai cafe or a coaching centre and design a tri-fold for it. Write the copy yourself, take your own photos on a phone and print a folded proof. Then redo it as an 8-page A5 booklet. These two pieces show clients and employers that you understand both single-sheet folds and multi-page layout, which is exactly what agencies and print studios test in interviews.
If you want guided practice, our InDesign course covers grids, styles, brochures, menus and print PDFs on real briefs. Brochures and print production are also part of the 6-month graphic design diploma, along with Photoshop, Illustrator and branding. For the layout thinking behind every good brochure, read our guide to layout design.
Frequently asked questions
Which software is best for brochure design?
Adobe InDesign is the standard for brochures because it handles pages, text flow, styles and print PDFs well. Illustrator works for a single-sheet tri-fold with very little text. CorelDraw is common in Indian print shops. Canva is fine for drafts, but check the print export carefully.
What is the standard size of a tri-fold brochure?
In India most tri-fold brochures are printed on an A4 sheet (297 x 210 mm) folded into three panels of about 99 mm each. The panel that folds inside is kept 2 to 3 mm narrower so it closes flat. Always confirm the exact panel widths with your printer before you start.
How many pages should a brochure booklet have?
A stapled (saddle-stitched) booklet must have a page count that is a multiple of 4, for example 8, 12 or 16 pages, cover included. If your content fills 10 pages, either cut it to 8 or add useful content to reach 12.
What paper is used for brochures?
Printers in India usually suggest art paper (gloss or matt) for the inside sheets and a thicker board for booklet covers. Ask for a printed paper sample before you decide, because the same design looks very different on gloss and matt.