Wedding Card Design: Layout, Fonts, Sizes and Print Finishes
Wedding card design step by step: what to write, common card sizes, Hindi and English fonts, layouts, colours and print finishes like foil and laser cut.
To design a wedding card, first collect the exact names, dates, venues and functions from the family. Pick the size and format with the printer and set up the file with 3 mm bleed. Build a cover with a motif, a main invitation page and one insert per function. Use two fonts at most and check every spelling twice.
Wedding card design is the planning of a printed or digital invitation that tells guests who is getting married, when, where and which functions they are invited to. A good wedding card looks like the family's taste, reads clearly in seconds and prints without surprises. This guide covers what to write, the sizes printers offer, layouts, fonts in Hindi and English, colours, print finishes and the checks that stop costly mistakes.
In India the wedding card is more than information. It is the first thing relatives see, it often goes to the family temple first and many people keep it for years. That is why families spend time on it and why designers who can handle wedding cards well get steady work every wedding season, from Chandni Chowk card shops to studios that make premium boxed invites.
Step 1: Collect the content before you design
Wedding cards change many times because the content arrives in pieces. Ask for everything in one message, in writing.
| Content | What to confirm |
|---|---|
| Invocation line | Ganesh blessing, a shloka, a verse, a dua or none |
| Names | Full names of the bride and groom, exact spellings in English and Hindi |
| Parents and family | Who is inviting: parents, grandparents, the whole family |
| Functions | Mehendi, haldi, sangeet, wedding, reception: each with date, time and venue |
| Venue details | Full address, landmark, a map QR code if wanted |
| RSVP | Two or three names with phone numbers |
| Extras | "With best compliments from", hashtag, dress code, no gifts note |
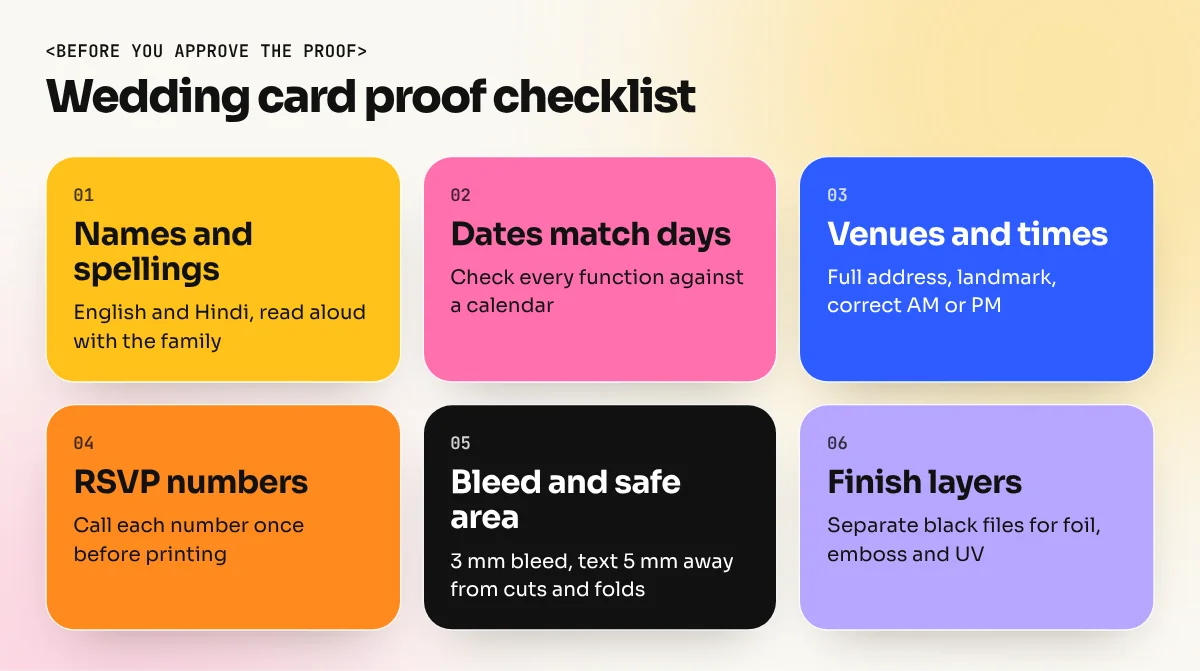
Ask the family to send the final text typed, not as a photo of handwriting. Then send it back to them as a PDF and get a written "OK" before you start layout. Most reprints happen because of a wrong date or a spelling mistake in a name.
Step 2: Pick the format and size with the printer
The format decides the layout. Talk to the printer early, because they know which envelopes and boxes they already stock.
| Format | What it is | Good for |
|---|---|---|
| Single card | One sheet printed front and back | Simple, low budget, small guest list |
| Folded card | Sheet folded in half to open like a book | Most common style in Indian markets |
| Card with inserts | Main card plus separate small cards for each function | Weddings with many functions |
| Scroll card | Paper scroll in a tube or box | Royal or traditional themes |
| Boxed invite | Card set inside a box, sometimes with sweets | Premium, close relatives |
| Digital e-invite | Image or short video for WhatsApp | Guests abroad, second rounds, save the date |
Common printed sizes are around 5 x 7 inches, 6 x 8 inches, 6 x 9 inches and square 6 x 6 or 7 x 7 inches, but treat these only as a starting point. The printer's envelope size is the real limit. Inserts are usually a little smaller than the main card, so they sit inside without bending.
Step 3: Plan the layout and the order of pages
A wedding card has a reading order, just like a brochure. Plan it on paper before you open the software.
- Cover. A motif (Ganesh, a kalash, florals, a monogram of the couple's initials) and maybe the couple's first names. Keep it uncluttered.
- Main invitation page. The invocation line at the top, then the inviting family, then the couple's names (the largest text on the card), then the main ceremony with date, time and venue.
- Inserts or inner pages. One function per insert: name of the function, date, day, time, venue and dress code if any.
- Back or last page. RSVP names, phone numbers and a map QR code.
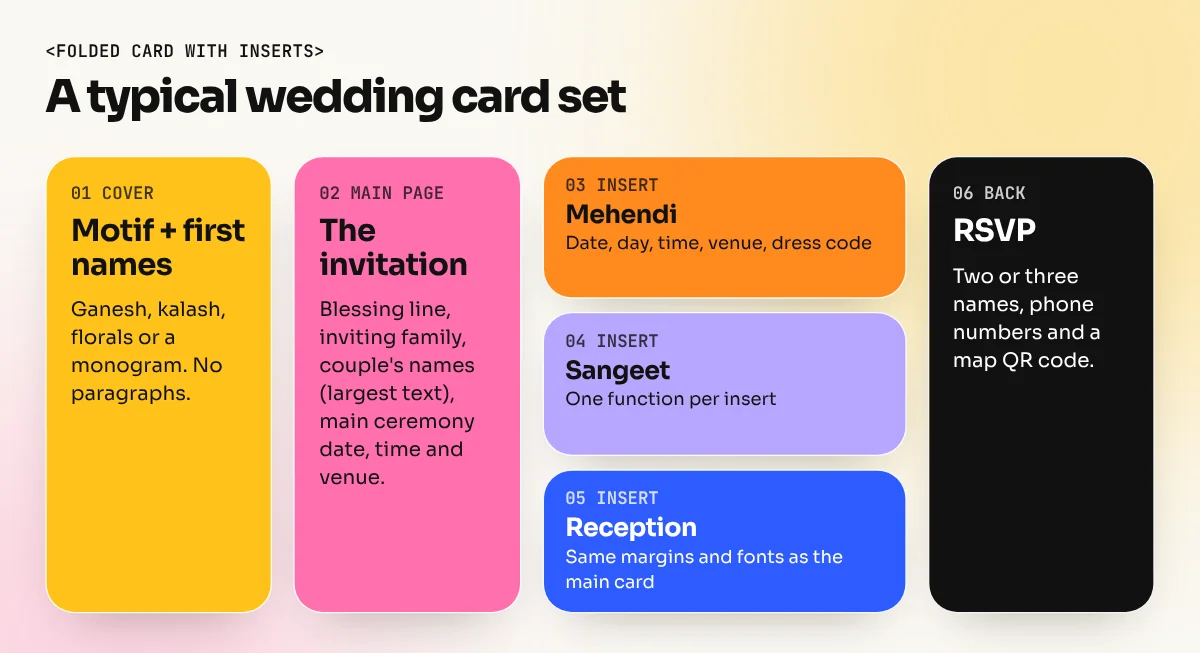
Use a centred layout for traditional cards, because it feels formal and balanced. Modern cards can use left aligned text and more white space. Whichever you choose, keep the same margins on every page and insert so the set looks like one family.
Step 4: Choose fonts for Hindi and English
Fonts set the mood faster than any motif. Many cards in India mix Devanagari and English, so pick a pair that works together.
| Role | Style | Tip |
|---|---|---|
| Couple's names | Elegant script or a bold display serif | Use it only for names, never for long text |
| Headings (function names) | Serif or decorative capitals | Add letter spacing for a premium feel |
| Body text (date, time, venue) | Clean serif or sans | At least 9 to 10 pt so older relatives can read it |
| Hindi text | A clear Devanagari font | Free options include Tiro Devanagari Hindi and Mukta on Google Fonts |
Script fonts are hard to read in all capitals or at small sizes, so test the names at real size. When you use a free font, check its licence allows commercial print. Our guide to font pairing explains how to match a decorative font with a readable one.
Always type Hindi with a Unicode font and check the matras and half letters carefully. Some older CorelDraw workflows still use legacy Hindi fonts, which can break when the file moves to another computer. Convert text to curves before you send the final file.
Step 5: Colours, motifs and the overall style
| Style | Colours | Motifs |
|---|---|---|
| Traditional North Indian | Red, maroon, gold, saffron | Ganesh, kalash, shehnai, paisley |
| South Indian | Deep green, gold, temple red | Temple bells, kolam patterns, banana leaves |
| Royal | Navy, wine, ivory with gold foil | Palace arches, jharokhas, elephants |
| Floral pastel | Blush pink, sage, peach, ivory | Watercolour flowers, leaves |
| Modern minimal | Ivory, black, one accent colour | Monogram, line art, lots of white space |
Keep text contrast high. Gold text on red looks rich on screen but can become hard to read in print unless it is foil. If you use a pattern background, put text on a plain area or a light panel. A quick check: print the page in greyscale. If the names and dates still read clearly, the contrast is fine.
Step 6: Print finishes and file setup
Finishes are where wedding cards get their wow factor and where most print problems start. Plan them in the file from day one.
| Finish | What it does | How to set up the file |
|---|---|---|
| Foil stamping | Shiny gold, silver or rose gold areas | Separate file or layer in 100 per cent black for the foil areas only |
| Embossing | Raised shapes or names | Simple, bold shapes; separate layer for the emboss area |
| Laser cut | Fine cut patterns like jaali | Cut path as a single vector line; keep text away from cuts |
| Screen printing | Thick ink, often on coloured board | Fewer colours, each colour on its own layer |
| Spot UV | Gloss coating on chosen parts | Separate black layer for the UV area |
| Velvet or textured board | Premium touch | Ask for samples; fine details may not show |
For the main artwork:
- Set the page to the final size with 3 mm bleed on every side.
- Keep text and important motifs at least 5 mm inside the trim and away from the fold.
- Work in CMYK and keep images at 300 ppi at the final size.
- Use 100 per cent black or a single colour for small text, not a mix of four inks.
- Export a PDF with bleed and crop marks, plus the separate finish files the printer asks for.
Our guide to CMYK vs RGB explains why screen colours look different on paper and how to avoid dull prints.
Step 7: Make a digital e-invite too
Most families now also send the card on WhatsApp. Make a digital version from the same design, not a phone photo of the printed card.
- Export each page as a high quality JPG or PNG in RGB.
- For a single image, a portrait size around 1080 x 1350 pixels reads well on phones. For WhatsApp or Instagram status, use 1080 x 1920 pixels.
- Make the text a little larger than in print, because people read it on a small screen.
- Keep the file size small enough to send quickly. Name it with the couple's names.
Common wedding card mistakes
| Mistake | Result | Fix |
|---|---|---|
| Wrong date or day | Reprint and embarrassment | Check the day against a calendar, get written approval |
| Spelling of names | Upset family members | Ask for typed names, read them aloud with the family |
| Gold text without foil | Hard to read | Use foil, or a darker colour for small text |
| Text near folds and cuts | Words cut or cracked | 5 mm safe area, keep clear of folds |
| Too many fonts | Looks crowded | One display font, one text font, one Hindi font |
| Size without an envelope | Extra cost, delay | Confirm envelope or box size first |
Wedding cards make a strong portfolio set. Design a full suite for an imaginary couple: cover, main card, three inserts, a save the date and an e-invite. If you want to learn this on real print briefs, our CorelDraw course covers card layouts and print files the way Indian card printers work. The 6-month graphic design diploma adds branding, Photoshop and Illustrator. For a smaller card job to practise first, read our visiting card design guide.
Frequently asked questions
What is the standard size of a wedding card in India?
There is no single standard. Printers commonly offer sizes around 5 x 7 inches, 6 x 8 inches, 6 x 9 inches and square 6 x 6 or 7 x 7 inches. Choose a size that fits a ready envelope or box the printer stocks, or you will pay for custom envelopes.
Which software is used for wedding card design?
Most Indian card printers and designers use CorelDraw, while agencies often use Adobe Illustrator. Both handle vector motifs, Hindi and English text and print files with bleed. Photoshop is used for photo cards and digital e-invites.
What should be written on a wedding card?
The invocation or blessing line, the names of the bride and groom with their parents, the main ceremony with date, time and venue, the RSVP names and phone numbers. Other functions like mehendi, haldi and the reception usually go on separate inserts.
How long does wedding card printing take?
It depends on the finish and quantity. Simple offset cards can be ready in a few days, while foil, laser cut or boxed cards take longer. Ask the printer for a timeline and plan the design to be final at least three to four weeks before the cards must be posted.