"Catalogue Design: Layout, Product Pages and Print"
Catalogue design step by step. Plan the pages, build a grid in InDesign, lay out product pages with clear photos and prices, then pick binding and print.
To design a catalogue, list every product, plan the page count, set a grid in InDesign and build master pages for headers and page numbers. Give each product the same photo size and text order, group items by category, add a clear cover and contents page, then export a PDF with 3 mm bleed.
Catalogue design is the job of arranging many products on many pages, so a buyer can find what they want in seconds. A good catalogue has a clear cover, a contents page, one repeating layout for products and clean print files. This guide shows you the full process, from planning the pages to choosing the binding, using a catalogue design layout that works for any shop, factory or brand.
If you design one well, you are not just making pages. You are making a sales tool. A garment exporter in Delhi, a sweet shop with gift boxes and a hardware dealer with 300 items all need a catalogue that is easy to flip through. That is a steady source of paid work for a designer.
Plan before you open InDesign
Most catalogue problems start before the design starts. Spend an hour on this planning table.
| Question | Why it matters |
|---|---|
| How many products are there? | Decides the page count and how many items per page |
| Who reads it? | A wholesale buyer wants codes and sizes. A shopper wants pictures. |
| Where will it be used? | Printed for a trade fair or sent as a PDF on WhatsApp? |
| Do prices change? | If yes, plan a separate price list |
| What is the budget? | Decides paper, binding and number of copies |
| Do you have product photos? | Poor photos cannot be saved by good layout |
Ask the client for all products in one sheet with name, code, size, colour options and price. If the client sends data in a spreadsheet, you can later use the Data Merge feature in InDesign to fill pages quickly. Ask for photos on a plain background so the pages look consistent.
Choose size and page count
Common catalogue sizes:
| Size | Dimensions | Best for |
|---|---|---|
| A4 portrait | 210 x 297 mm | Most product catalogues and trade fairs |
| A5 | 148 x 210 mm | Pocket catalogues and small product ranges |
| Square | About 210 x 210 mm | Lifestyle, design and gift brands |
Page count rule: if the catalogue is stapled in the middle (saddle stitch), the total pages must be a multiple of 4, such as 8, 12, 16 or 20. For thicker catalogues the printer glues the pages at the spine (perfect binding), which looks more premium. Ask your printer about the minimum and maximum pages for each type, as these limits differ.
Build the structure
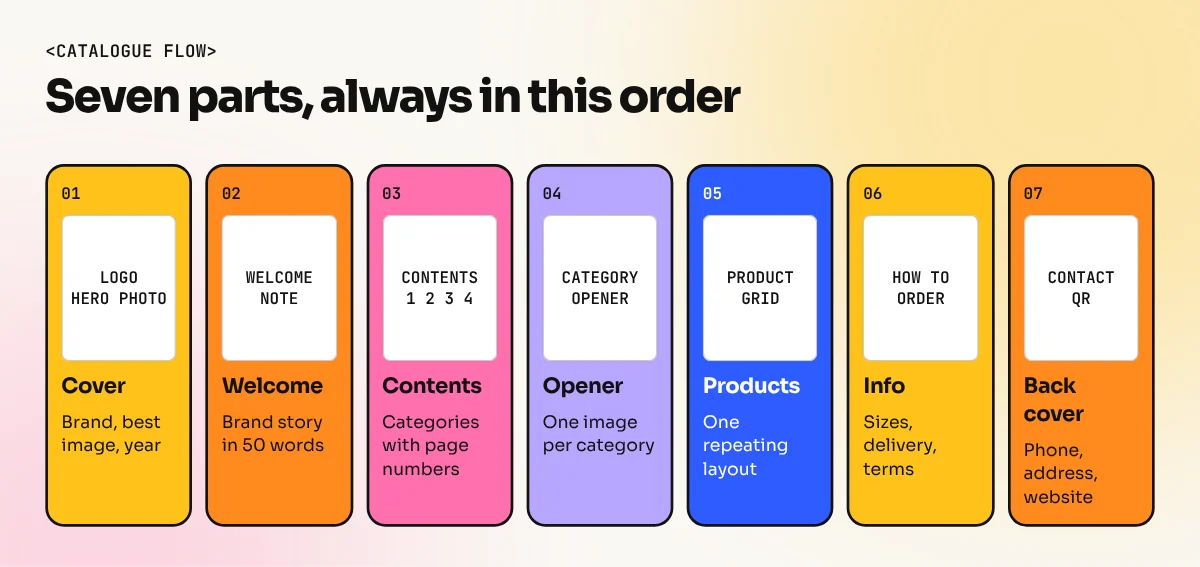
A reader should never feel lost. Use this order for almost every catalogue.
- Front cover: brand name, a strong product image and the year or season.
- Inside cover or welcome page: a short note, or a brand story in 50 words.
- Contents page: categories with page numbers.
- Category opener: one image and the category name before each group of products.
- Product pages: the repeating layout, which is the main work.
- Information page: sizes, how to order, delivery and terms.
- Back cover: address, phone, website and a QR code.
Set up the grid and master pages
A grid keeps hundreds of products looking tidy. This is the same idea we explain in our guide to layout design.
- In InDesign, create a new document with facing pages on, your chosen size, 3 mm bleed and margins of 12 to 15 mm.
- Set a column grid. Two or three columns work for most catalogues. Four columns suit small items such as jewellery or screws.
- Add baseline guides so text lines match across pages.
- Build master pages with page numbers, a running header with the category name and the brand logo in a small size.
- Make paragraph styles for product name, code, description and price. Change a style once and the whole book updates.
Do the same for object styles for photo frames and price tags. This one habit saves hours when the client says "make all photos bigger".
Design the product page
The product page is repeated many times, so make one version and test it on real content.
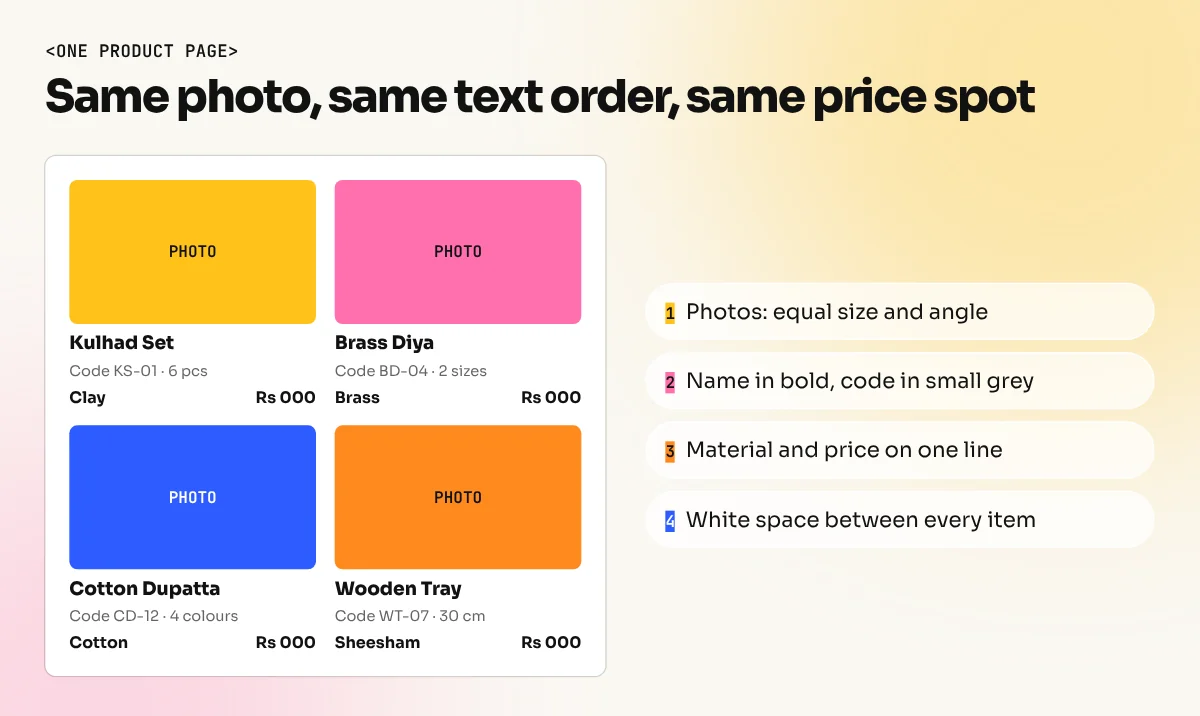
- Same photo size for every product in a row. Different sizes look messy.
- Same text order: name, code, short description, sizes, price.
- Clear price spot: always in the same place, for example below the photo at the right.
- White space: give each product room. A crowded page makes buyers tired.
- Short descriptions: one line of what it is and one line of what is special.
- Icons for features: small icons for size, material or washable save words.
Test the layout with your longest product name and your shortest. If both look fine, the design will hold up for the rest.
Colour, fonts and photos
Use the brand's colours, but keep the page mostly white or light so the products stand out. Use a maximum of two fonts. A clean sans serif for details works well with one stronger font for headings. If you want help choosing, read our guide to font pairing.
Photos matter more than anything else in a catalogue. Use the same light, the same angle and the same background across products. Clean the cut-outs in Photoshop and keep shadows consistent. If the photos come from different shoots, adjust brightness and colour so they match.
Export and print
Before sending to print, run through this list.
- Check links: all images present and at 300 dpi at the printed size.
- Colour: CMYK. See our guide on CMYK vs RGB if you are unsure.
- Bleed: 3 mm, or the amount your printer asks for.
- Preflight: run the InDesign Preflight panel and fix errors.
- Fonts: embedded or outlined.
- Export: PDF with bleed and crop marks, using the printer's preset if they give one.
- Proof: ask for a printed or digital proof before the full run.
For a PDF to share on WhatsApp or email, make a second, smaller RGB export so it opens fast on a phone.
Digital catalogue or printed catalogue?
Many buyers now ask for a PDF first. A printed book still works well at trade fairs, in shop visits and as a gift to regular customers. A good plan for most small businesses is to design once and make two exports: a print PDF in CMYK with bleed and a light PDF in RGB for WhatsApp and email. Add clickable contents links in the digital version, so a buyer can jump straight to a category.
Mistakes that make catalogues hard to use
- No contents page in a book with more than 12 pages.
- Different layouts on every page, so buyers cannot scan.
- Tiny text under 8 pt for codes and sizes.
- Low resolution photos that look soft in print.
- Prices baked in to a catalogue that will need an update next month.
- Wrong page count for the chosen binding, which leaves blank pages.
Learn catalogue design properly
Catalogues bring together grids, styles, photo handling and print production. In our InDesign course you practise exactly these skills on real briefs, including multi-page documents and print-ready PDFs. They are also part of the 6-month graphic design diploma, along with Photoshop, Illustrator and branding. If you also want to practise short print jobs, our guide to brochure design is a good next step.
Frequently asked questions
How many pages should a catalogue have?
Plan the number from your product count, then round up to a multiple of 4 if you will use saddle stitch binding, because paper is folded in sets of four pages. Small catalogues are often 8, 12 or 16 pages. Larger ones with a spine use perfect binding. Ask your printer for their limits.
Which software is best for catalogue design?
InDesign is the best choice because it handles many pages, master pages, styles and data merge for product lists. Canva can work for a very short catalogue. CorelDRAW is used by some print shops but is harder for long page counts.
What size should a product catalogue be?
A4 portrait (210 x 297 mm) is the most common because it prints cheaply and fits a bag or file. A5 is handy for a pocket catalogue. A square size gives a modern look but may cost more to print. Choose the size before you design.
Should prices go inside the catalogue?
If prices change often, keep them on a separate price list or insert, so you do not reprint the whole catalogue. If prices are stable, print them under each product in a clear, consistent spot.