How to Remove a Background in Photoshop: 4 Methods That Work
Remove background in Photoshop with 4 methods: one-click Remove Background, Select Subject, Object Selection and the Pen tool. Fix hair edges and save a PNG.
To remove a background in Photoshop, open the photo, click Remove Background in the Properties panel or the contextual taskbar and Photoshop adds a layer mask that hides the background. For tricky edges like hair, use Select Subject or Object Selection, refine with Select and Mask, then export a PNG to keep transparency.
To remove a background in Photoshop, select the layer, click Remove Background in the Properties panel and Photoshop hides everything except the main subject with a layer mask. That is the one-click method and it works well on clear photos. For hair, glass or busy backgrounds you need a better method. This guide shows four methods, when to use each and how to fix the edges so your cutout looks professional.
Which method should you use?
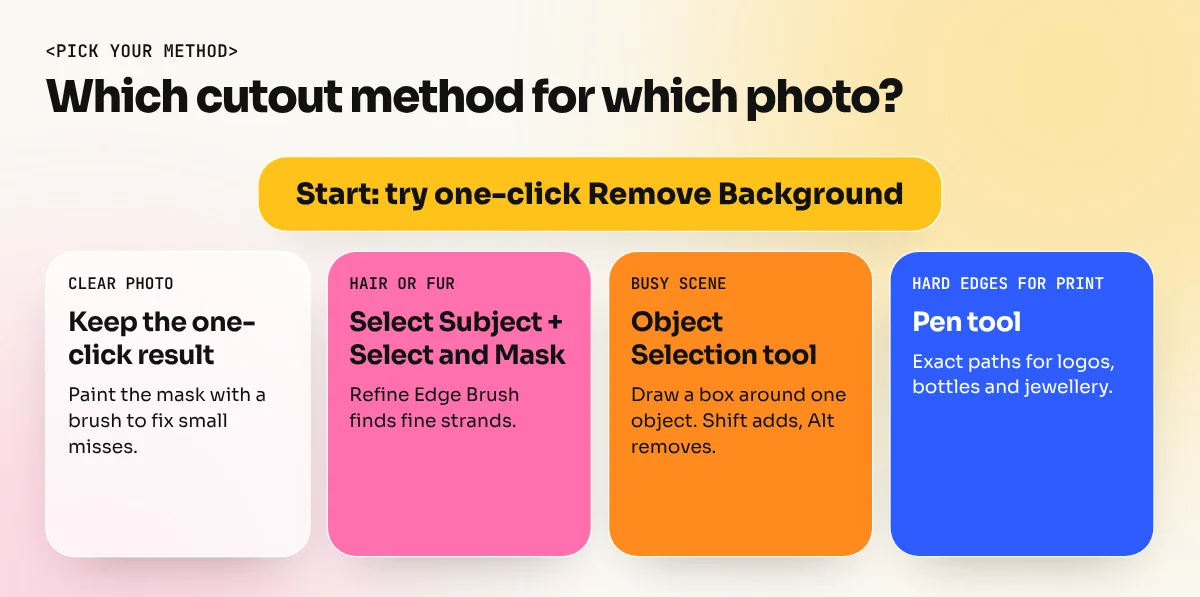
Pick the method by the photo, not by habit.
| Method | Best for | Speed | Edge quality |
|---|---|---|---|
| 1. Remove Background (one click) | Clear photos of people, products, pets | Seconds | Good on simple edges |
| 2. Select Subject + Select and Mask | Hair, fur, soft edges | 2 to 5 minutes | Very good |
| 3. Object Selection tool | One object in a busy scene | 1 to 3 minutes | Good |
| 4. Pen tool | Logos, jewellery, hard-edged products for print | 5 to 20 minutes | Cleanest |
Start with method 1. If the result is not clean, move to the next one.
Before you start: set up the file safely
- Open the photo in Photoshop.
- If the layer shows a small lock, click it so the layer can be edited.
- Press Ctrl+J (Windows) or Cmd+J (Mac) to duplicate the layer. Now your original stays safe.
- Zoom to 100 per cent so you can see the edges clearly.
Always work with layer masks, not the Eraser tool. A mask hides pixels. The Eraser deletes them for ever. When a client says "bring back the shadow under the shoe", a mask lets you do it in one brush stroke.
Method 1: One-click Remove Background
This is the fastest way and the one most beginners should try first.
- Select the layer you want to cut out.
- In the Properties panel, look under Quick Actions and click Remove Background. You can also use the contextual taskbar that appears under the image.
- Photoshop finds the subject and adds a layer mask.
- Zoom in and check the edges.
Adobe describes this feature on its Photoshop pages: it uses AI to detect the subject and mask out the background. It is not magic. It can miss thin straps, cut off a hand or leave part of a chair.
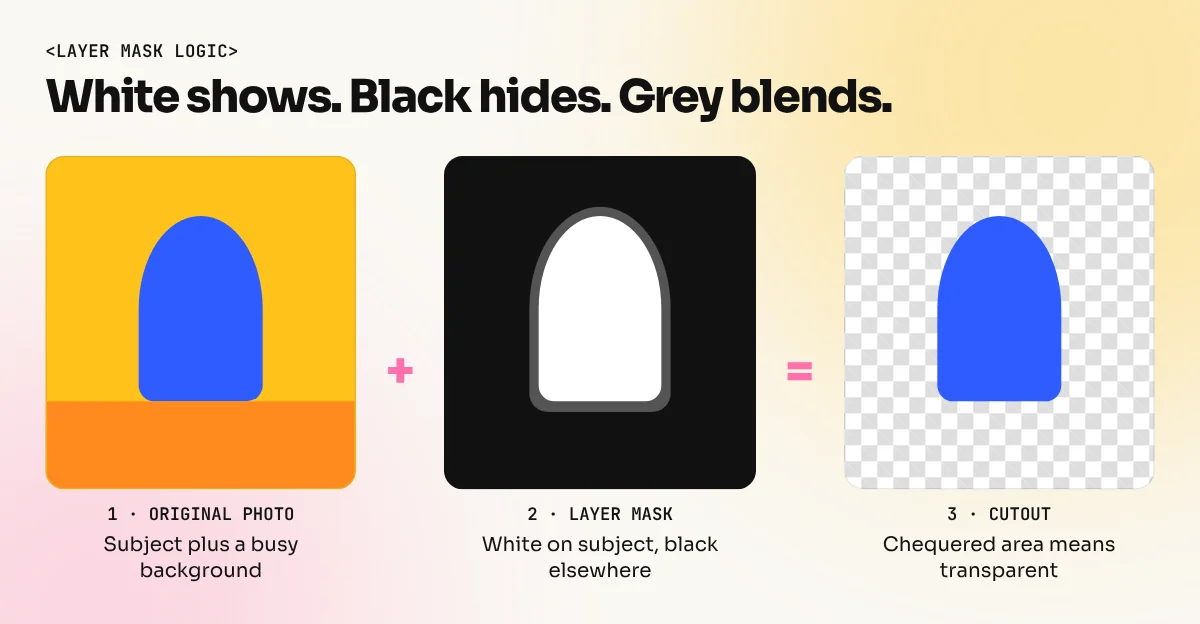
To fix mistakes: click the layer mask, pick the Brush tool (B) and paint with white to bring back a part and black to hide a part. Press X to swap between white and black.
Method 2: Select Subject, then Select and Mask
Use this for people with hair, animals with fur or any soft edge.
- Go to Select, Subject. Photoshop makes a marching-ants selection around the main subject.
- Click Select and Mask in the options bar.
- Change the View to On Black or On White so edge problems become easy to see.
- Use the Refine Edge Brush and paint over hair and soft edges. Photoshop finds the fine strands.
- Set Output To to Layer Mask and press OK.
Useful sliders:
| Slider | What it does | Typical use |
|---|---|---|
| Smooth | Removes jagged edges | Small values only |
| Feather | Softens the edge | 0.3 to 1 px for a natural look |
| Shift Edge | Moves the edge in or out | Negative value removes a halo |
| Decontaminate Colors | Replaces old background colour on the edge | Use for hair against a bright wall |
Adobe's help pages cover these tools, including how Enhance Edge refines masks. Spend a few minutes with each slider and watch the edge change.
Method 3: Object Selection tool
When the photo is busy, such as a product on a crowded market table, selecting the whole subject can fail. The Object Selection tool lets you tell Photoshop what you want.
- Pick the Object Selection tool from the toolbar (shortcut W).
- Draw a loose box or lasso around the object. Photoshop snaps to its edge.
- Hold Shift and draw again to add a missed part. Hold Alt (Option on Mac) to remove a part.
- Click the Add Layer Mask button at the bottom of the Layers panel.
Then clean the edges with the brush on the mask, as in method 1.
Method 4: Pen tool for the cleanest cutout
For logos, jewellery, bottles and any product that goes on a print catalogue, the Pen tool still gives the cleanest edge. It draws exact paths with smooth curves, so there is no fuzzy edge to fix.
- Pick the Pen tool (P) and set the mode to Path.
- Click around the object to place anchor points. Click and drag to make a curve.
- Close the path by clicking the first point.
- Press Ctrl+Enter (Cmd+Return on Mac) to turn the path into a selection.
- Click Add Layer Mask.
The Pen tool needs practice. Our guide to the Illustrator pen tool explains the same idea of anchor points and handles. It is a good way to build the skill. Many studios in Delhi use Pen tool cutouts for catalogue and e-commerce product images because the edges stay sharp when printed large.
How to fix common problems
- White halo around the edge: Select the mask, go to Select and Mask. Move Shift Edge to a small negative value like minus 10 per cent. Or tick Decontaminate Colors.
- Part of the subject missing: Paint with white on the mask.
- Leftover background between arms or legs: Use the Object Selection tool with Alt to subtract, or paint black on the mask.
- Hard, cut-out look: Add a feather of 0.5 px and a soft shadow under the subject.
- Cutout looks pasted on a new background: Match brightness and colour using a Curves or Hue/Saturation adjustment layer clipped to the subject.
Save and export correctly
- Save your work as a PSD so the mask stays editable.
- For web, social media and presentations, choose File, Export, Export As, PNG and tick Transparency.
- For print, place the cutout in your design file (Photoshop, Illustrator or InDesign) and export the final PDF there.
- Do not save as JPG if you want transparency. JPG fills the empty area with white.
Where background removal is used in real design work
In everyday studio jobs, cutouts appear everywhere. A sweet shop wants its Diwali box photo on a festive banner. A clothing brand needs 40 product images on a plain white background for an online store. A coaching centre wants its topper's photo on a hoarding. Each job needs a clean edge and correct colour, not just a fast click.
AI tools can now remove a background in seconds, but a designer still checks the edge, matches the lighting and places the subject so the whole design feels right. Our guide on Photoshop Generative Fill shows how AI can also create a new background for the cutout. The Photoshop shortcut keys list will make your selection work faster.
Learn it properly
Background removal is one of the first skills clients test, because it shows how well you control masks and selections. At our South Extension institute, the Photoshop course teaches masking, selections, retouching and compositing with real briefs. The 6-month graphic design diploma adds layout, branding and print. Practise on 10 different photos, such as a kurta on a hanger, a kulhad and a portrait with curly hair. Your skill will grow fast.
The bottom line
Try one-click Remove Background first. If the edge is rough, switch to Select Subject with Select and Mask for hair, the Object Selection tool for busy photos or the Pen tool for hard edges. Always use a layer mask, keep a PSD copy and export a PNG when you need transparency.
Frequently asked questions
What is the fastest way to remove a background in Photoshop?
Open the image, select the layer and click Remove Background in the Properties panel or the contextual taskbar. Photoshop detects the subject and hides the background with a layer mask. You can then paint the mask to fix mistakes.
How do I remove a background without losing quality?
Use a layer mask instead of the Eraser tool. A mask hides pixels without deleting them, so you can bring any part back. Keep the file as a PSD while you work and export a PNG when you finish.
How do I get a transparent background in Photoshop?
After removing the background, you will see a grey and white chequered pattern. Go to File, Export, Export As and choose PNG with Transparency ticked. A JPG cannot hold transparency and will add a white background.
Why does my cutout have a white or dark outline?
It is leftover colour from the old background around the edge. Use Select and Mask with a small Shift Edge value or Decontaminate Colors, or shrink the mask by one or two pixels.