"Sticker Design: Sizes, Die Cut Lines and Print Files"
Sticker design made simple. Pick the size, draw a clean die cut line, add bleed and export a print-ready file, with tips for kiss cut, vinyl and sticker sheets.
To design a sticker, draw simple bold artwork, add a 2 to 3 mm white border around it, extend the colour past that border as bleed and draw one clean cut line on its own layer. Work at 300 dpi or in vector, then export a PDF. Ask your printer for the exact cut line colour name.
Sticker design is the job of making a small piece of artwork that looks good, sticks well and is cut in the right shape. To do it well you need three things: simple bold artwork, a clean cut line and a print file with bleed. This guide shows you each step, so your sticker comes back from the printer exactly as it looked on your screen.
Stickers are one of the easiest ways for a new designer to earn. A Delhi cafe wants a logo sticker for its takeaway bags. A student wants a set for a laptop. A small brand wants a "thank you" sticker for every parcel. These jobs are small, quick and repeat often.
Start with where the sticker will live
Before you draw anything, ask three questions.
- Where will it be stuck? A water bottle, a laptop, a helmet, a glass window and a product box all need different materials.
- How big will it be? Size decides how much detail you can keep.
- Will it face sun, water or rubbing? Outdoor and bottle stickers need waterproof vinyl and often a clear laminate on top.
Here is a simple guide to sizes. These are common working sizes, not fixed rules, so always check with your printer.
| Use | Common size | Design note |
|---|---|---|
| Phone case or small bottle | About 40 to 60 mm | One bold shape, two or three words at most |
| Laptop or notebook | About 70 to 100 mm | Good for a logo plus a small detail |
| Helmet or bike | About 100 to 150 mm | Thick outlines and high contrast read best |
| Product label or seal | About 30 to 50 mm | Keep the logo clear and the text large |
| Sticker sheet | A5 or A4 with many small stickers | Leave equal gaps between every sticker |
Make artwork that works small
A sticker is seen from a distance of a metre or less, often at a small size. So the artwork has to be simpler than a poster.
- Use bold shapes. Thin lines under 0.5 pt can break up when printed small.
- Limit your colours. Three to five colours look sharp and print cleanly.
- Keep text short. One or two words is ideal. Use a thick, simple font.
- Check contrast. Dark outline, bright fill and a light border make a sticker pop on any surface.
- Avoid tiny details. If you cannot read a detail when the design is zoomed out to the real size, remove it.
A good habit is to set your artboard to the real sticker size in millimetres from the start. Then print or view it at 100 percent and judge it like a customer.
Build the three layers
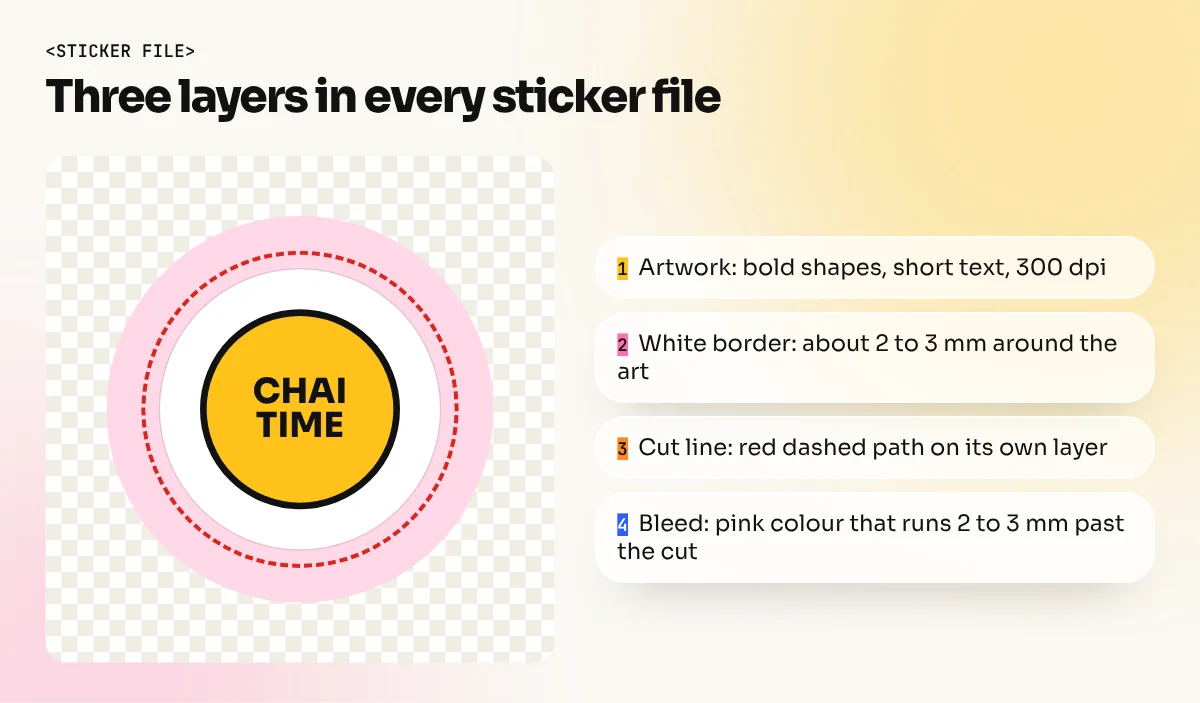
Every print-ready sticker file has the same three parts. Keep them on separate layers so the printer can switch them on and off.
1. The artwork
This is the picture, logo or lettering. Keep it as vector in Illustrator or CorelDRAW when you can. If it is a photo or a painting, make sure it is at least 300 dpi at the final size.
2. The white border
Most stickers have a thin white border, often 2 to 3 mm, around the artwork. It protects the edge of the design from peeling and makes the cut forgiving. In Illustrator, select your shape and use Object, Path, Offset Path to make the border. Fill it with white.
3. The cut line
The cut line is a single clean vector path that tells the machine where to cut. It should follow the outer edge of the border, with smooth curves and no tiny spikes or loops. Put it on its own layer and give it a spot colour. Many print shops use the name "CutContour", but this is not universal, so ask your printer which name they want. Set the stroke to no fill and a thin stroke.
Die cut or kiss cut?
This choice changes both the look and the price, so it is worth understanding.
| Type | How it is cut | Best for |
|---|---|---|
| Die cut | Through the sticker and the backing paper, in the exact shape | Single stickers, logo stickers, premium packs |
| Kiss cut | Only through the top layer, backing stays whole | Sticker sheets, easy peel stickers, giveaway sets |
| Sheet or roll labels | Many stickers cut on one sheet or a roll | Product labels and seals |
If you are designing a sheet of stickers, use kiss cut and leave an even gap between stickers, so the cutting machine has room to work. If you are designing one hero sticker, die cut gives the cleanest result.
Choose the right material and finish
Design and material go together. A beautiful design on the wrong material still fails.
- Vinyl is the usual choice for water bottles, laptops and outdoor use because it handles water and wear well.
- Paper stickers are fine for dry, indoor use such as notebooks, gift tags and packaging seals. They also cost less.
- Matte looks soft and modern. Gloss makes colours look brighter. Ask the printer to show a sample.
- A clear laminate adds protection against scratches and sunlight.
- Transparent stickers need care. White parts of your design may print as clear unless the printer adds a white ink layer, so ask first.
Printer names, materials and finishes differ from shop to shop, so always match your artwork to the printer's own file guide.
Set up the file for print
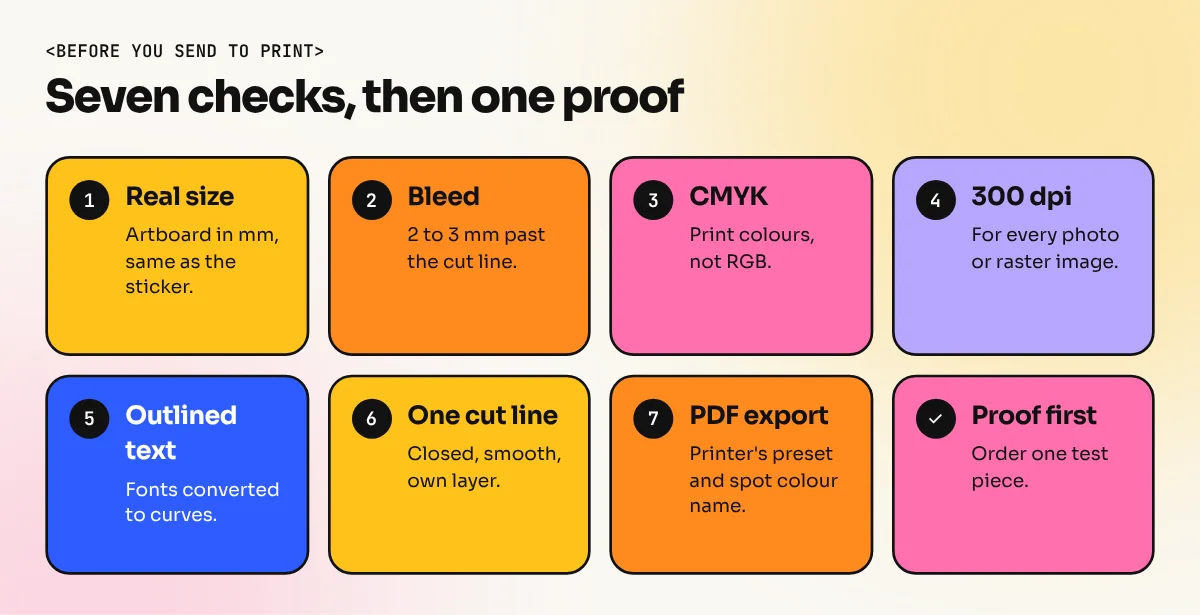
Follow this checklist before you send the file.
- Size: the artboard matches the real sticker size.
- Bleed: extend the artwork and border colour 2 to 3 mm beyond the cut line, or whatever your printer asks for.
- Colour mode: use CMYK for print. If you want to understand why screen colours look different on paper, read our guide on CMYK vs RGB.
- Resolution: 300 dpi for any raster image.
- Text: convert fonts to outlines so nothing changes on the printer's computer.
- Cut line: on its own layer, one closed path, spot colour as the printer asks.
- Export: a PDF with the cut line included or a separate file, as the printer prefers.
For a complete print checklist that works for stickers and every other print job, see our print-ready file checklist.
Sticker design ideas to practise
If you want ideas for your portfolio, try these six briefs.
- A logo sticker for an imaginary chai stall in Old Delhi.
- A set of six emoji style stickers for a college fest.
- A "fragile" and "handle with care" set for an online seller.
- A thank you sticker for a home bakery.
- A travel sticker pack with Delhi landmarks such as India Gate or the Red Fort.
- A motivational lettering sticker with one strong word.
Show each one in a mockup on a laptop or a bottle. Our guide on mockups for graphic design shows you how to present these like a studio.
Common mistakes to avoid
- No bleed. A thin white line appears on the edge when the cut shifts slightly.
- Cut line too tight. Keep the cut line a little outside the border, not through the artwork.
- Too much detail. Small text and thin lines vanish at 50 mm.
- RGB colours. Bright neon colours on screen will look duller in print.
- Wrong material. Paper sticker on a water bottle peels within days.
- Skipping a proof. Always order one test piece before a big run.
Learn this properly
Sticker design brings together vector drawing, colour, print rules and a bit of mockup work. If you want guided practice on real briefs, our Illustrator course covers the Pen tool, shapes, offset paths and print-ready export. It is also part of the 6-month graphic design diploma, along with Photoshop, branding and print production.
Frequently asked questions
What is the best size for a sticker?
It depends on where the sticker goes. Small stickers for phone cases and bottles are often around 50 mm. Laptop and helmet stickers are usually 75 to 100 mm. Pick the size first, then design the artwork for that size, because fine detail disappears when a sticker is small.
What is the difference between die cut and kiss cut stickers?
A die cut sticker is cut through both the sticker and its backing paper, so it comes out in the exact shape. A kiss cut sticker is cut only through the top layer, so the backing paper stays whole and the sticker peels off it. Kiss cut is common for sticker sheets.
Which software is best for sticker design?
Illustrator is the best choice because the artwork and the cut line stay as sharp vectors. CorelDRAW also works well and many print shops use it. Photoshop is fine for photo or painted stickers, but the cut line still needs a vector path.
Can I make stickers on Canva?
Yes, for simple designs. You can build the artwork and export a high quality PDF or PNG with a transparent background. But Canva cannot make a proper cut line layer, so most printers will need to trace the shape themselves or ask you for a vector file.