"Label Design for Products: Sizes, Rules and Print"
Label design explained for beginners. Learn how to measure a container, set bleed and safe zones, pick label material, add FSSAI details and send a print-ready file.
Label design means creating the artwork that goes on a bottle, jar, box or pouch. Measure the real container first, build a die line, add 3 mm bleed, keep text 3 mm inside the edge, work in CMYK at 300 dpi and add the legal details your product needs. Then check a printed proof before the full run.
Label design is the job of making the artwork that sits on a bottle, jar, tin, box or pouch so that it looks good on the shelf and also fits the container exactly. A good label does three things. It tells people what the product is, it shows the brand and it carries every detail the law asks for. This guide shows the process in the order a working designer follows it, from the first measurement to the print-ready file.
What a label really is
A label is a small poster that has to survive a hard life. It is curved around a bottle, rubbed in a bag, wet in a fridge and read from two feet away by someone in a hurry. That is why label design is different from poster design. Size, material and print method decide the layout before you choose a single colour.
Most labels you will design fall into these groups.
| Label type | Where you see it | Design point to remember |
|---|---|---|
| Wrap-around | Jars, bottles, tins, cans | Artwork must join neatly where the ends meet |
| Front and back | Shampoo bottles, oil bottles | Front sells, back informs |
| Neck label | Wine style bottles, sauces | Very small area, so keep one clear message |
| Shrink sleeve | Cold drinks, protein tubs | Artwork stretches, so keep text away from curves |
| Box label | Courier boxes, gift boxes | Flat surface, easier layout |
| Pouch label | Spice packs, snack packs | Printed on the pack itself, check folds and seals |
Step 1: Measure the container
Never guess the label size from a photo. Take the real bottle or jar and measure these three things with a ruler.
- Height of the flat label area. Stop before the shoulder curve and before the base.
- Width or circumference. For a round container, measure the diameter and multiply by 3.14. A jar that is 60 mm wide has a circumference of about 188 mm.
- Overlap. A wrap-around label usually overlaps by a few millimetres so the join does not gap. Ask your printer for the number they use.
Write the final size on a sticky note and keep it on your screen. Every later decision depends on it.
Step 2: Set up the file with bleed and a safe zone
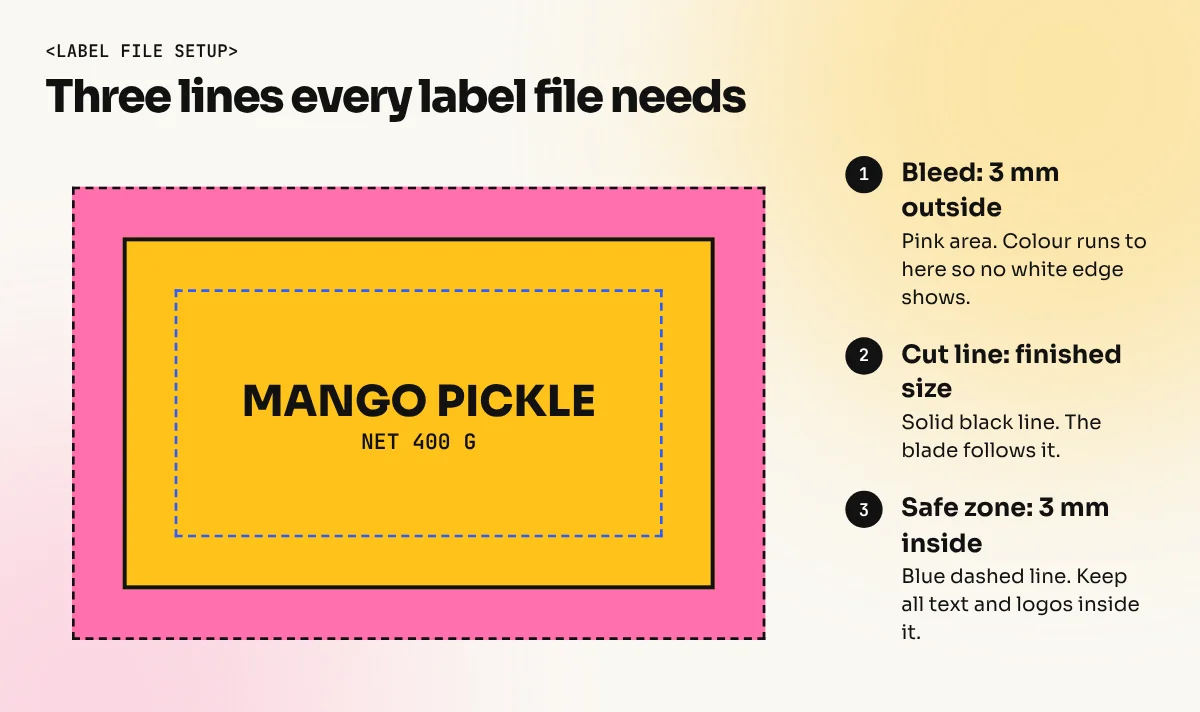
Open Illustrator or CorelDRAW and create the artboard at the final label size. Then add three guides.
- Cut line. The exact finished size of the label. The blade follows this line.
- Bleed. Extend backgrounds and colour blocks 3 mm outside the cut line. This hides small cutting shifts.
- Safe zone. Keep all text and logos 3 mm inside the cut line. Anything closer may be trimmed or look cramped.
If the label has a special shape such as a circle or a rounded rectangle, your printer will usually give a die line file. Place it on its own layer, set it to a spot colour and never print it. Our print-ready file checklist lists every setting to check before you export.
Step 3: Choose material and finish before you design
The material changes how colours look, so decide it early and ask the printer for a sample.
| Material | Feels like | Good for |
|---|---|---|
| Coated paper | Smooth, light | Dry products, boxes, short shelf life |
| Matt paper | Soft, no shine | Premium, handmade looking brands |
| BOPP film (plastic) | Waterproof, clear or white | Oils, sauces, cosmetics, fridge items |
| Vinyl | Tough, flexible | Outdoor use, bottles that get wet |
Finishes such as gloss lamination, matt lamination and spot varnish add protection and shine. A spot varnish on the logo only makes it catch the light without any extra ink. Use finishes to support the design, not to hide a weak layout.
Step 4: Build the layout in order of importance
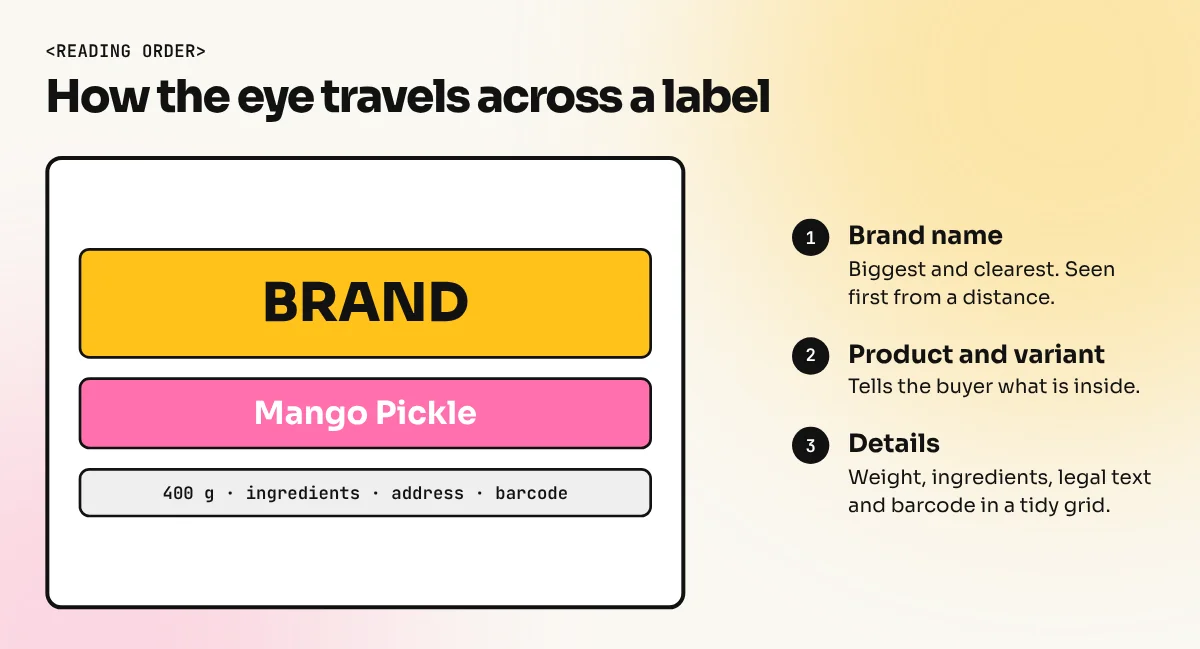
Use the same hierarchy rule you would use on any design. The eye should read the label in three steps.
- Brand name. The biggest and clearest element.
- Product name and variant. For example "Mango Pickle" or "Cold Pressed Mustard Oil".
- Details. Weight or volume, ingredients, instructions, address and barcode.
For the front of the label, keep the number of elements low. One logo, one product name, one picture or pattern and one small line of detail is often enough. The back can hold the rest in a tidy grid. If you need help with order and emphasis, read our guide on visual hierarchy in design.
Practical type rules for small labels:
- Use fonts with open shapes and clear numbers. Thin decorative fonts break up in small print.
- Keep small text dark on a light background, or white on a deep colour with enough weight.
- Test at real size. Print the label at 100 per cent and read it at arm's length.
Step 5: Add the legal details
For packaged goods sold in India, the law decides part of your layout. These are the rules designers meet most often. The exact wording and sizes are set by the authorities, so always confirm the current text before printing.
For packaged food, the Food Safety and Standards (Labelling and Display) Regulations from FSSAI cover items such as the name of the food, the list of ingredients, nutrition information, the vegetarian or non-vegetarian symbol, the manufacturer's name and address, net quantity, batch details, dates and the FSSAI licence number with its logo. The vegetarian symbol is a green dot in a green square outline and the non-vegetarian symbol is a brown dot in a brown square outline.
For most packaged goods, the Legal Metrology (Packaged Commodities) Rules ask for the common name of the product, net quantity, maximum retail price inclusive of all taxes, month and year of manufacture or packing, the maker's address and consumer care details.
Cosmetics, medicines and chemicals have their own rules, so a client in those fields must tell you what is required. Your job is to leave room for it. Plan the back label in a grid before you add the artwork, so that the required text never gets squeezed in at the end.
Step 6: Colour, barcode and proof
- Colour mode. Work in CMYK. Screen colours such as bright neon blue or green look duller in print. Our guide on CMYK vs RGB explains why.
- Resolution. Photos should be 300 dpi at final size. Logos and text should stay vector.
- Barcode. Keep the quiet zone (white space) around it. Print it in black on white or a very light colour. Never stretch it.
- Proof. Ask for a printed proof or a digital press sample on the real material. Check colour, text size, bleed and how the label looks when stuck on the real container.
Common mistakes to avoid
| Mistake | What goes wrong | Fix |
|---|---|---|
| No bleed | White edge after cutting | Extend background 3 mm |
| Text near the cut line | Words get trimmed | Keep 3 mm safe zone |
| Label sized from a photo | Wrong fit on the bottle | Measure the real container |
| Too many fonts | Looks messy and cheap | Use two fonts at most |
| Ignoring the curve | Text distorts on the bend | Keep key text on the flat middle |
How to practise label design
Pick three products from your kitchen. Measure each container, draw the die line and redesign the label in Illustrator. Print it at 100 per cent, stick it on with tape and see how it looks from a metre away. Do this for five different containers and you will have a small portfolio piece that shows real skill. If you want guided practice with checks from a trainer, the Illustrator course covers vector layouts. The 6-month graphic design diploma builds the wider design base. For how labels fit into a full pack, read our guide to packaging design.
Summary
Label design is measurement first and decoration second. Measure the container, set bleed and a safe zone, choose the material, build a clear hierarchy, leave room for the legal text and always check a proof. Follow these steps and your labels will fit, print well and look like they belong on the shelf.
Frequently asked questions
What size should a product label be?
There is no single size. It depends on the container. Measure the flat label area of your bottle or jar, subtract a small gap at the edges and give the printer that exact size. For a wrap-around label, work out the circumference first.
Which software is best for label design?
Adobe Illustrator is the usual choice because labels need sharp vector text and clean die lines. CorelDRAW is also common in Indian print shops. Photoshop is useful for photos on the label, but the final layout is best built in a vector tool.
What is bleed in label design?
Bleed is extra artwork that runs past the cut line, usually 3 mm. It stops a thin white edge from showing if the blade cuts slightly off. Backgrounds and colour blocks must always extend into the bleed.
Do food labels in India need special details?
Yes. Packaged food has to follow the FSSAI Labelling and Display Regulations and the Legal Metrology rules for packaged goods. Always confirm the current list with the regulation text or your licensing consultant before printing.